2.8. Installing the Components
This chapter will explain how to install the Security Center components on your server(s). We recommend to start with the Backend, since the Frontend installation requires the configuration of the Backend.
Please keep in mind that you can install the Frontend and Backend on two separate servers. For simplicity, we chose to install both services on the same server. If you wish to install the Frontend and Backend on two separate servers, please see Installing two seperate servers.
2.8.1. Install the ASGARD Security Center (All-in-one)
The Nextron Universal Installer is a web based installer
which will guide you through the installation of our
ASGARD products. The Nextron Universal Installer will install
one of the following products on your server (this manual
focuses on the ASGARD Security Center (All-in-one)):
ASGARD Management Center; alternatively if your license permits:
ASGARD Broker
ASGARD Gatekeeper
ASGARD Lobby
Master ASGARD
ASGARD Analysis Cockpit; alternatively:
Elasticsearch Cluster Node for ASGARD Analysis Cockpit
ASGARD Security Center, in the following variants:
ASGARD Security Center (Backend Only)
ASGARD Security Center (Frontend Only)
ASGARD Security Center (All-in-one, unrecommended)
Note
You can only install one product on one server, since the products are not designed to coexist on the same server. The exception being the ASGARD Security Center (All-in-one).
The installation takes roughly between 5-15 minutes, depending on your internet connection and the server you are installing the product on.
If you encounter problems during your installation, please see Diagnostic Pack for further instructions.
2.8.1.1. Requirements
The installation of the ASGARD Management Center requires the following:
A valid license file for the ASGARD Security Center
A configured FQDN (with some exceptions, see Valid FQDN)
Internet access during installation (see Connectivity Check)
Every Server must have a valid and resolvable FQDN (see Network Configuration)
2.8.1.2. Installation
After the ISO installer is finished with the setup, you will be greeted at the console login prompt with the following message:

Follow the instructions and navigate to the webpage displayed on your console. You will most likely get a browser warning when you connect the first time to the page. This is due to the page using a self signed certificate, since it will only be used to install the ASGARD Security Center. You can safely ignore this warning and proceed to the page.
You will be greeted with a small introduction as to what
the Nextron Universal Installer is and what it does. After
you click Next, you will be presented with the landing
page of the Nextron Universal Installer.
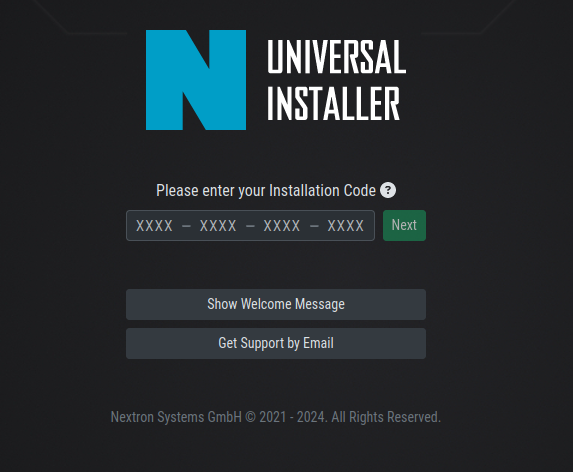
Enter the Installation Code from the terminal and click
Next. The Installer will now guide you through the
installation.
2.8.1.3. Connectivity Check
The Nextron Universal Installer will try to connect to our update server in order to download all the necessary packages once the installation starts. Make sure you can reach the update servers (see Internet).
Please configure your proxy settings if you are behind a proxy (see Proxy and NTP Settings).
2.8.1.4. Valid FQDN
The Nextron Universal Installer will prompt you to verify the FQDN which you configured during the installation of the base system (see Network Configuration). This is needed in order for your ASGARD Components to communicate via a HTTPs connection with each other. If there is a mismatch of FQDNs your components will not be able to communicate with each other.
If the displayed FQDN is not correct, you can change it by
clicking on the View FQDN Change Instructions button.
This will open a dialog with instructions on how to change
the FQDN of your server. Once you have changed the FQDN,
you can continue with the installation.

2.8.1.5. Proxy and NTP Settings
If you need to configure a proxy or change the NTP settings
of your system, you can do so by clicking on the Settings
button in the left menu of the Nextron Universal Installer.
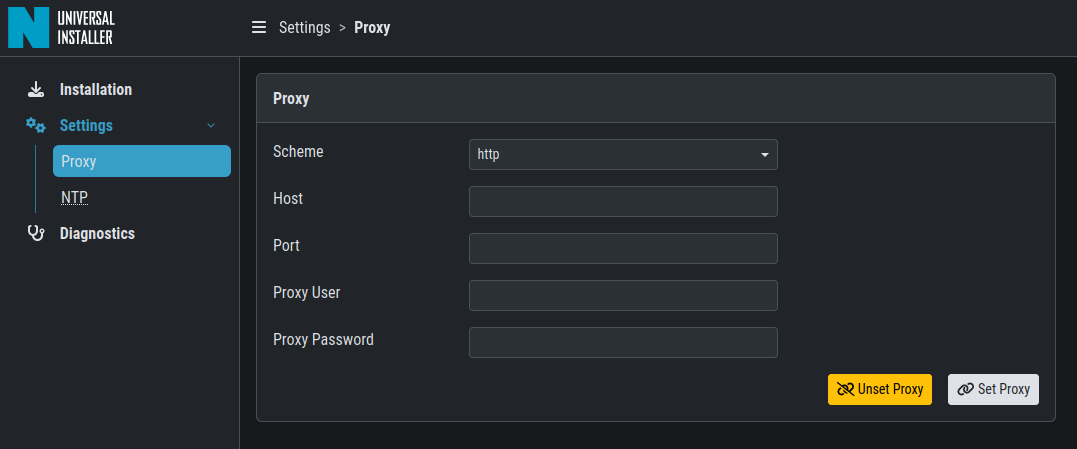
If you configured a proxy during the ISO installation, those settings will be carried over into the Universal Installer. The settings will also be carried over into your ASGARD Security Center. The same goes for NTP.
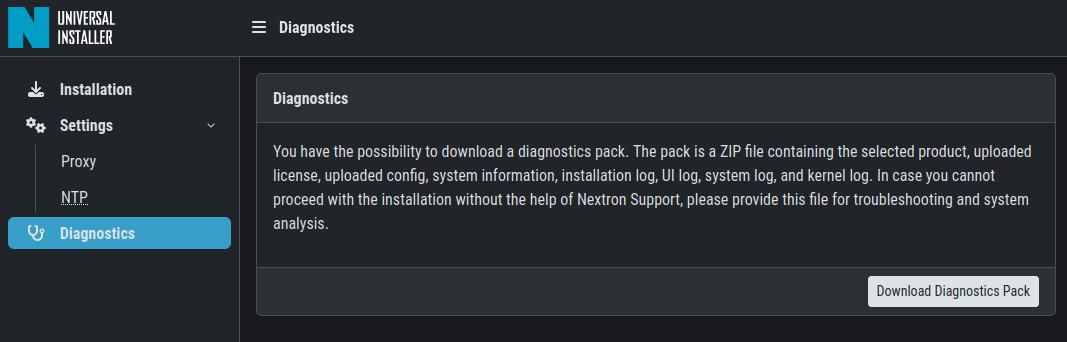
2.8.1.6. Diagnostic Pack
In case of errors or problems during the installation, you can
download a diagnostic pack by navigating to the Diagnostics
tab in the left menu of the Nextron Universal Installer. Click
on the Download Diagnostic Pack button to download the
diagnostic pack. You can then send the diagnostic pack to our
support team for further analysis.
2.8.2. Installing two seperate servers
If you wish to separate the Frontend and Backend of the ASGARD
Security Center, you can do so by installing the Backend on one
server and the Frontend on another server. Simply choose one of
the options during the Select Product stage of the Nextron
Universal Installer.
Hint
You have to start with the installation of the Backend, since the Frontend needs the configuration of the Backend to work properly.
2.8.2.1. ASGARD Security Center (Backend Only)
After the Nextron Universal Installer finished the installation of
the ASGARD Security Center Backend, you have to download the configuration
file from it (model.config). You can do this by connecting to the
server via SSH. The file can be found in the following directory:
/etc/asgard-security-center-backend/model.config
You can now start with the installation of the Frontend.
You can also check if the service of the Backend was installed successfully.
nextron@gatekeeper:~$ systemctl status asgard-security-center-backend.service
The status of the service should be active (running).
The Backend is running on TCP port 8443. You can now log into the Backend via
https://<FQDN>:8443.
2.8.2.2. ASGARD Security Center (Frontend Only)
During the installation of the ASGARD Security Center Frontend, you will
be prompted to upload the configuration file of the Backend. Use the file
(model.config) you downloaded earlier from the Backend. Once the installation
is finished, you can check if the service was installed successfully.
nextron@security-center:~$ systemctl status asgard-security-center-frontend.service
If the status of the service is active (running), the installation is finished.
You can now log into the frontend via https://<FQDN>.